Tuesday, April 30, 2013

Trunk Transformation

I think I was about 14 or so when my Grandma gave me this trunk for my birthday:


I think she was the only person who believed me at the time when I said I was going to travel the world.

For a long time, I basically lived out of a suitcase while I travelled.  So, my trunk stayed behind at my parents house.  And, over time, it took a bit of a beating. 


When I finally started to settle down and needed some furniture I rescued my trunk.

I just used some MDF type board that I had cut at the hardware store to size. 


I added a nice super thick layer of foam, wrapped it in quilt batting, and then wrapped the whole thing with some microfiber type fabric.


Added some home made cushions and now it's a bench!

I've picked the lock many times, but now
I just don't lock it.  If I ever remember the special
secret hiding place I put the key, then I'll lock it again~
But it still holds my treasures...


Yes, I was a bit of a Barbie fanatic when I was a kid.  I couldn't possibly let go of them so I keep them in my trunk.  I've also got a bag of Glamour Gals that I can't get rid of either.  They were like miniature Barbies...sort of.  Anyone else out there remember them?

Do you have any of your childhood toys kept in a special place?  Leave a comment!

Saturday, April 27, 2013

Easy Eyelet Collar

Another super fast quickie craft for today.  I've been on the road ALL week this week, in fact, I'm probably still on the road as you're reading this.  But I still make time for crafting~


Here's what you need to make your own pretty collar:


 Materials:
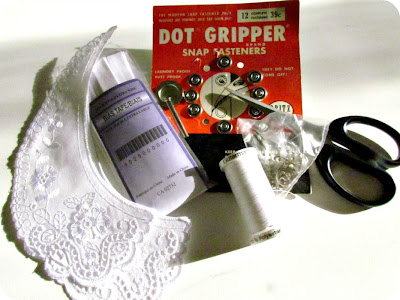
-eyelet or lace pre-made collar
-standard sewing kit (thread, scissors, machine, pins, etc.)
-double wide, double fold bias tape
-snaps

Steps
1) Cut a piece of bias tape the length of one collar times two plus an extra 4-6" depending on how low or high you want it to sit on your collarbone.  Press it flat and lay it down.  Notice how one side is just slightly narrower than the other?  Centre it onto the back side of your collar and stitch down.


Line up the raw edge and sew inside the first creased fold.


2) Now just fold the bias tape over to the front along it's fold lines.  See how it naturally hugs the edge?  and because the slightly wider side is on the front you won't see any edge of the bias tape.  Just stitch along the edge making sure to catch both side of your bias tape.


3) Figure out where you want your closure to be by trying on your  necklace and marking the overlap of the tape with a two pins.  Apply your snaps as per the package directions.  My snaps are super old school.  I picked up a whole bag of them at the thrift store.  They work great though!


4) Once you've secured both sides of your snap just snip the ends of the bias tape off.


There you go!  All done!  Wasn't that easy?  And now my necklace dilemma from Wednesday is solved!


I pick up these kinds of collars at the fabric store once in awhile.  They usually have a basket with different kinds for $1 each or less.  They come in handy for all kinds of things so it doesn't hurt to have a few on hand

I have no travel for work scheduled next week so I hope to get back into full on crafty mode again soon.  Have a crafty week everyone!  Don't by shy to leave a comment~

Thursday, April 25, 2013

The Great British Sewing Bee

A great BIG huge thank you to Gertie over at Gertie's New Blog for Better Sewing!   Last week she told all of her readers about a great new show airing on BBC right now and I'm completely addicted after watching only half an episode!


8 home sewers compete to win the title of the Britain's best home sewer.  Some of them have decades of experience and some only started sewing a few years ago.

Contestants and Judges
It's the funnest, least catty, and most educational reality show that I think I've ever seen.

Participants are judged by Mary Martin, "the best sewing teacher in the world", and Patrick Grant from Savile Row.


There are only 4 episodes (boohoo) but each episode is jampacked with sewing and great tips as well as one easy to make project with instructions for viewers.


This show will appeal to sewers of all levels of experience...including all of you out there who keep telling me that you've been thinking about taking up sewing but are feeling intimidated.

Would you compete on a reality show?  What kind of show do you think you could win?  I'm pretty sure there's now way I could beat out Ann on The Great British Sewing Bee but I think I could do pretty well on the Amazing Race.  What about you?  Leave a comment below~

Wednesday, April 24, 2013

Another Little Black Dress

Because you just can't have too many!


Here's the pattern I used:

You can see a print version of the same dress here~

I love the idea of this simple dress because you can dress it up or down with a change of shoes and jewellery easily.  But now I can't decide which necklace to wear with it.  I'm planning on wearing my new dress to facilitate a meeting at work.  Which necklace do you like best?


Leave a comment and let me know!  Owl, 60's turquoise beads, gold chain, emerald chain, or gypsy tassle?

Tuesday, April 23, 2013

Lady O

This has has very little to do with sewing and crafting but I have to share something with you.....the Oprah experience!!!!  Yes!  I got to see Oprah, live, in person!

Attending her show was on my bucket list, and when it ended, I just figured that was one thing I'd never get to do.  So, when it was announced that she was coming to Saskatchewan of all places, I knew I'd be there.

My sister and I went in on a ticket for my mom too as an early birthday present.  I put the ticket in this envelope:

My hands were so shaky from excitement
I had to get someone else to take our picture~
It was a great show.  Even though she was just up there on that stage, in front of more than 13,000 people, talking, she was entertaining.  She told all of the Oprah stories that we know and love but you could hear a pin drop.  Everyone was riveted to every word.


Could you talk in front of
13,000 people?!?!?
At the end, George Strombolopolous (Strombo for short) came out and did a little one on one chat with her. He's a Canadian radio host that now has his own late afternoon talk show.


I find myself very contemplative after the experience.  She talked a lot about finding your purpose and finding the stillness to let it come to you.  This is something I've been after for a long time, and hearing about her experiences really pushes me to focus a little more to figure it all out.


If you ever get the chance to stand in the light of Lady O....go for it!  You won't regret it~

She looks amazing!
Have any of you out there seen Oprah in person?  Did you have the thrill of seeing a taping of the show when it was still on?  Leave a comment, I want to hear all about it!!!!

Monday, April 22, 2013

My First Painting!

Because I don't have my hand in enough craft pots (or enough craft supplies stuffed into my closet) I decided to take up another hobby....watercolour painting~

It's something I've always wanted to learn, but I've never considered myself to be artistic.  I'm crafty sure, but artistic, not so much.

I've studied Art History though and have a great love an appreciation for painting, so I figured it's about time I just get over my fear of creating something horribly ugly, and dive in.

Here's my first painting.


It's just a bunch of blobs of colour but I kind of like it~


I really like this corner for some reason.


I've only had one class so far, but I'm having fun learning something new.  If you have any tips for me, leave a comment below.


My tip for you is...whatever it is you've always wanted to do but haven't, DO IT!  There's no such thing as failure as long as you're trying.

Saturday, April 20, 2013

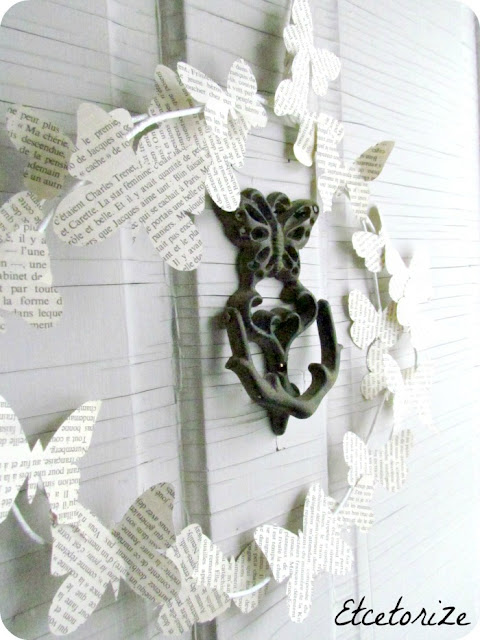
Butterfly Wreath

All of this travel for work has slowed me down, but I still feel the need to create!  As a result, we're just doing a quickie craft this week.  Don't get me wrong, it still has big impact, it's just not all that complicated.

Butterfly Wreath, Paper wreath, bookpage butterfly

Here's what you need to make your own Springtime Butterfly Wreath:

Materials:
-wire hangers
-book pages
-hot glue gun w/glue
-optional: White acrylic or spray paint, Sparkle Mod Podge, sponge brush
-cutting machine or the patience of a saint and scissors

Steps:
1) Stretch out your wire hangers into something that looks more like a circle than a hanger.  Don't worry about the top, we'll use that to hang your wreath once it's done.  Also, don't worry if it's not perfect, it's not supposed to be~


2) Now, if it weren't still winter here I would've just taken my circulesque hangers outside and sprayed them white (or better yet use white hangers), but it's still way too cold here, and besides I didn't have any spray paint left over.  So, I used acrylic paint and just dry brushed it on.


Use it fairly dry and just bounce your brush onto the metal hanger.  If you try to brush it on you'll only sweep the paint right off.  Again, it doesn't have to be perfect, because most of it will be covered anyway.

3) While your paint is drying use your book pages to cut out butterfly shapes.  I'm lucky enough to have a Silhouette machine that did all the work for me.  I used the butterfly shape called "Butterfly Set" that comes with 5 different shapes and sizes that you can ungroup and use however you want.


4) Your paint should be dry now so let's put a good healthy coat of Sparkle Mod Podge on top.  This is a small detail but it's what can really make your wreath sing.  I like to use Sparkle Mod Podge because it's fairly mess free sparkle.  You can go the messy route and do it with spray or sprinkle, but I've got enough mess going on already.


5) Let your hangers dry one more time and get the glue gun ready to go because next we're going to start adding butterflies.  While your gun is heating up, you can use a bit of thin wire to bind your hangers together if you've used more than one.


6) Now the fun part....add some butterflies.  Use as many or as few as you like!


7) The last step is to take down your Christmas sign from your door and put up your springtime wreath in the hopes that Mother Nature see's it and STOPS SENDING SNOW!!!!  It's been six months!  We get it, you can move on now Mr. Winter~

Butterfly Wreath, Paper wreath, bookpage butterfly

I still might add a some Glimmer Mist but for now it goes well with my Butterfly door knocker.

Don't be shy to send me some warm weather and leave a comment below~

Thursday, April 18, 2013

Pretty and Comfy!

So sorry everyone, I promised to share this project with you yesterday and I got so caught up in my roadtrip for work that I forgot to hit the publish button!

I've been travelling for work a lot lately, but this week took me some place I've never been before.....north....the FAR north.


See that big arrow right smack dab in the middle of Canada?  Well, that's where I was all day yesterday.  Almost as far north in Saskatchewan, Canada as you can get (but not quite).


It's a lovely place, everyone was super friendly, and it was surprisingly quite warm out!  All in all an exhausting but great trip.

Anyway, onto more crafty things....

I'm going to show you something very embarrassing....this is the chair that I sit on at my computer, where I spend so much of my spare time sharing all of my creative projects with you guys.


I've had this chair for about 15 years.  I finally gave away the cheapy desk it came with about 5 years ago.  I have a hard time letting go of stuff that still works.  And for all intents and purposes, this chair still works....it's just not comfortable, at all~

So, remember the fabric I showed you on Monday that Wholeport sent me?


 Well, here's what I did with the beautiful floral piece:


Look at all that padding!  I added a piece of foam and a couple layers of quilt batting to the seat before I covered it.


I remade the back, making it longer and tighter


And now, here's where I sit when I'm talking to all of you...


So much prettier!

Check out Wholeport for your own crafting and sewing projects.  They've got all types of fabric and supplies (even baking stuff!).


*This post is sponsored by Wholeport.com however I received no compensation other than supplies and all opinions are my own.

Linkwithin

Related Posts Plugin for WordPress, Blogger...