Wednesday, July 31, 2013

Floral PJ Pants

Take a look at the pretty fabric that Wholeport sent me this month.


It wasn't quite what I was expecting so I had to think fast to come up with a project to make with it.

I thought I could use it to make so great pj pants but then quickly realized there was only a metre and wasn't sure it was enough.

Aha!  I remembered I had an old pattern from New Look in my collection that would be perfect.  I used to love New Look patterns, even though they often started at sizes that were way too big for me.  They're hard to find now though.
New Look 6060
When I put the pattern pieces on the fabric I quickly realized it was much wider than the 150cm shown in the product listing.  This was even after pre-washing to shrink it.

That meant I could run both leg pieces side by side with plenty of room to spare to make a drawstring, pockets, or any other little embellishments I needed.

I ended using a really wide blanket binding ribbon for the waistband to add some contrast.


So cute!  Even though I wasn't expecting it, it turned out to be exactly the fabric I needed~
After 3 years of blogging, standing
around outside taking pictures of myself
in my pj's is pretty normal as far as
my neighbours are concerned~
I quickly threw the little tank top together from the same pattern, but it's a little too little, so into the donation pile it goes.  I'll make another one the right size and add this cute little iron-on transfer that I also got.
Check out the quilting fabric section at Wholeport.com for more pretty fabric choices.

*This post is a sponsored post however I did not receive any compensation other than free product as shown and all opinions are my own.

This project was featured here:

Sugar Bee Crafts

Monday, July 29, 2013

Floral Bikini

While I was in Edmonton last month I stopped in at my favourite discount fabric store there and picked up a metre of this pretty printed spandex.


I can feel fall creeping up on this week here in northern Saskatchewan so I figured I better get to work and sew up a bathing suit with it before it's too late!

DIY swimwear, DIY swimsuit, DIY bikini, sew your own bikini

I used my own Endless Options Bikini Top pattern that I shared with you last year and my favourite Kwik Sew undies pattern for the bottoms.  I love the Endless Options top because it's just like it says, there are endless options for wearing it!


The bottoms were a little tricky because I lined them and had to make little tiny casings for all of the elastic instead of just securing it to the inside with a big zigzag stitch like I normally would.

I also wanted to use these cute plastic rings from my mom's stash for embellishments at the hip seam.


I refuse to show up on the internet in nothing but a bikini but here's a snapshot of how they sit so you can see that it doesn't just look like a pretty diaper.  The elastic really does stretch out and lay perfectly.


Only a few more weeks of beach weather around here but I think this little set will come in handy on my next warm weather vacation, hopefully this winter.

I'm obsessed with collecting vintage swimsuit patterns but I have to admit, until I came up with this great combo, I've always found sewing swimsuits a major challenge.  How about you?  Do you make your own swimwear?  If you have any tips or tricks make sure to leave a comment below~

Friday, July 26, 2013

Paper Earrings

It's been awhile since I've worn earrings.  I figure it's because I'm not crazy about my little collection that I have so I decided that it's time to add some....at no cost!


DIY paper jewellry, paper jewellery, Silhouette earrings, DIY earrings, paper earrings

Here's what you need to make your own pretty paper earrings with things you might already  have in your craft closet:


Materials:
-pretty medium to heavy weight scrapbooking paper
-Dimensional Mod Podge
-Glue gun or other adhesive
-small hole punch and needle nose pliers
-shepard hook earrings tops
-small rhinestones or other embellishments

Steps:
1) I let my Silhouette cut out my hydrangea shapes with the biggest of the 3 shapes only 3/4" wide.


If you don't have a Silhouette you can still do this project.  As you can see it's a very simple shape that just gets progressively smaller.

2) Coat all of your petal pieces with a nice thick layer of Dimensional Mod Podge.


I love this stuff because it dries clear and looks and acts a lot like resin without all the mixing.  You can get as close to the edge as you want and it shouldn't fall off.

3) Before you walk away to let everything dry overnight stick a little rhinestone (or better yet a Swarovski crystal) right in the middle of the smallest shapes.


Let the Mod Podge dry overnight making sure to shift your pieces a little about an hour or two into it to ensure that none of them are stuck to your table below.

4) Now you can do what I did and skip right to the next step but I don't recommend it.  You can see in the photo where I had to unglue my pieces to get the paper to fit the hole punch.  So just punch your holes now and save yourself the aggravation.


5) Now add the smallest dab of hot glue onto the middle of the largest shape and start stacking the other shapes on top, rotating as you go to make sure we can see all of the petals.


6) Using your needle nose pliers attach the shepard hooks.  You can add jump rings if you want to in between, I just didn't have any the right colour so I went straight to the hook. (I'm determined to use up my massive stash of jewellery making supplies without adding to it)


Tah Dah!  You've got yourself the prettiest pair of earrings on the block!

DIY paper jewellry, paper jewellery, Silhouette earrings, DIY earrings, paper earrings

I like them so much I made another pair in a different shape....butterflies, of course!

DIY paper jewellry, paper jewellery, Silhouette earrings, DIY earrings, paper earrings

I wish you could see how glossy they are.  They look just like resin covered ceramic but they're just paper!

DIY paper jewellry, paper jewellery, Silhouette earrings, DIY earrings, paper earrings

This is really just a twist on my original paper jewellery that I made ages ago.  You can also see the necklace I made from paper here.

What do you think?  Are you a diamonds only kind of gal or could you see yourself sporting a pair of paper earrings?  Leave a comment below~

Thursday, July 25, 2013

Silhouette Nail Templates

I've been keeping a close eye on the Silhouette blog and store this week because they've been unveiling all kinds of super cool new products, like the new stamping kit!

You can make your own stamps with your Silhouette!
And the new Etching kit!

But the coolest thing I stumbled across in the online store are these fun nail templates that you can make from vinyl!!

Click here to read the 'how to' from the designer.

This one is my fav~
The designer's name is Rivka Wilkins and she has 37 pages of awesome shapes and designs in the online store.  Look her up and see if you find something you like!

Make sure to come back tomorrow, I'm working on a fun new jewellery project with my Silhouette!

*This is not a paid post (I only wish Silhouette would be a sponsor here!).  These are just some fun products that I thought you'd all find interesting.

Wednesday, July 24, 2013

Subtle Changes

I mentioned the other day that I didn't get much crafting done on the weekend because I was busy painting.

This was the room in question.


It's been patiently waiting for the rest of it's make-over for several years now.


When I moved in this room had carpet!!!  Yes!  Can you believe it?!?!  Ewwwww!  That came out fast and in went the new flooring.  But after painting the rest of the house I ran out of steam when I got here.

Now it looks like this.


I know, I know, what's the difference right?  To the untrained eye it looks pretty much the same.  But when you've been living with a lilac mauve washroom for 5 years, going white makes a big difference.


I also took out the 1990's light fixtures and replaced them with the set above and two singles in the 'beauty' area.  I bought the fixtures several years ago and they've been sitting in their boxes in my closet ever since.  It feels very good to finally have them up on the wall where they belong.

I changed out the shelving in this weird little alcove that I hope to someday (when I win the lottery) to make a little bigger and make into a tiled glassed in shower.  I've got big dreams I tell ya~


My washroom is on the rather large size.  The house is over 100 years old so it's a pretty safe bet that this was once a bedroom (or two).

Everyone who comes over falls in love with my claw foot bath tub but see that hoop shower curtain rod up top?  Well, that's my arch nemesis.

It doesn't look so bad from this angle.


But during the course of painting I figured I could straighten it out and actually fix the part that was falling out of the wall.


Argh!  Bad idea!  I should've left well enough alone.  For now the shower rod has won, but I have big plans to replace it altogether, so we'll see who's laughing soon my friend!

Anyway, that's a tour of my washroom, or as people say in other countries, bathroom or wc.  What do you call this private space in your home?  Do you have big dreams for your space or are you happy with what you've got?  Leave a comment below~

Monday, July 22, 2013

Paint Chip Quickie Craft

I didn't have much time for crafting this weekend.  I went to a birthday party on Saturday and then on Sunday I suddenly decided it was time to finally paint the washroom.  Seeing as how it's been on my to do list since I moved into my  house 5 years ago (wow, time flies) I figured I better get on it.

When at last the paint was on the walls, the new light fixtures were almost all up, with only one slightly damaged toe, and several pulled muscles,  I pulled out some paint chips I had picked up earlier in the day at the hardware store.


Then I pulled out my two all-time favourite punches.

Whenever I'm doing paper projects I ended up using these at some point.
  Even the smallest scrap can be made into a photo corner~

Here are a few batches of what I ended up with.


These are fun to use on cards or in scrapbooks.


And with the paint chips you can make them all coordinate.


These punches are great on pretty patterned paper, especially when it has some added glitter.

Have you waded into the paint chip fad yet?  What did you make with yours?  Leave a comment below!

Friday, July 19, 2013

EZ Summer Cover-Up

I haven't done a refashion in awhile so, with the gift of an oh so not pretty T shirt from work, I figured now would be a great day to do one!

refashion, T-shirt refashion, T shirt DIY, Summer Cover up, T shirt transformation
You know I'm having a bad hair day
when the cowboy hat comes out~
Here's what you need to make your own:


Materials:
-1 ugly T shirt, preferably with very little design and both inside and outside are the same
-standard sewing kit (thread, sewing machine, scissors, straight edge, chalk runner, pins)

Steps:
1) Cut right up the side seams of your ugly T Shirt.


2) Now, cut off the sleeves.


3) Cut straight across the top layer only, cutting off the neckline.


4) If your T shirt is long enough, cut off about 4 inches or so from the bottom.  But hang onto this piece because we're going to sew it back on later.


5) OK, almost done cutting.  For the last one, using your front piece only,  run your chalk runner or other marking tool about 2.5" in from the top right corner to about 2.5" in from the bottom left corner.


6) Cut along this line...remeber, we're using the FRONT PIECE ONLY.


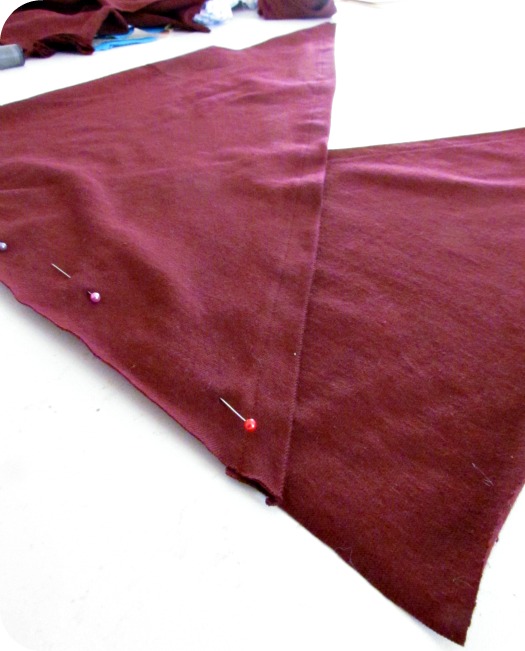
7) Now, see the piece that looks like an upside down triangle?  Turn it right side up, flip it so the 'right side' is now facing the table, and line it up with the bottom of the other triangle.

It should look something like this:


8) You can skip this step if you want to but please do me a favour and just finish the long edges of each triangle.  You know how raw edges drive me crazy and it's such an easy step.  Just turn the long edge in about 5/8", press it down and stitch.  See?  So easy~

9) Now we start to sew it all together.  Adjust the front pieces to fit your body so that it's not too tight and there's no gaping in the front.  Just drape it loosely on your body or a dress form to get an idea and then pin the bottom and baste together.


10) With right sides together, stitch your front and back together at the side seams.


11) Again, you don't have to do this, but I would be so grateful if you did, just finish the armhole seam.  It's easy, just like before, just turn the edge over about 5/8", press it, and sew it done.  Ahhhhh, doesn't that look better?

12) Now you can stitch the shoulder seams together.  Don't worry about the back of the neck.  Once you stitch the top of the shoulder it will automatically turn itself in.


13) Almost done....remember that little piece we cut off the bottom?  Grab that.  It has a nice finished hem that we can use.  Cut off a couple of inches from the length so that it will fit a little more snugly around your hip area.


14) Sew the side seams together so that you have a tube.

15) With right sides together, line up the raw edges and re-attach to the bodice.

And that's it!  Now you have a cute little top to wear over a tank top or to throw over your bikini top on the way to the beach.


It might take awhile, but eventually we will rid the world of ugly T-shirts~

Have a crafty week everyone!

Linkwithin

Related Posts Plugin for WordPress, Blogger...